即时通讯 IM Web 快速开始
即时通讯 IM Web 快速开始
本页面介绍如何快速集成即时通讯 IM Web SDK 实现单聊。
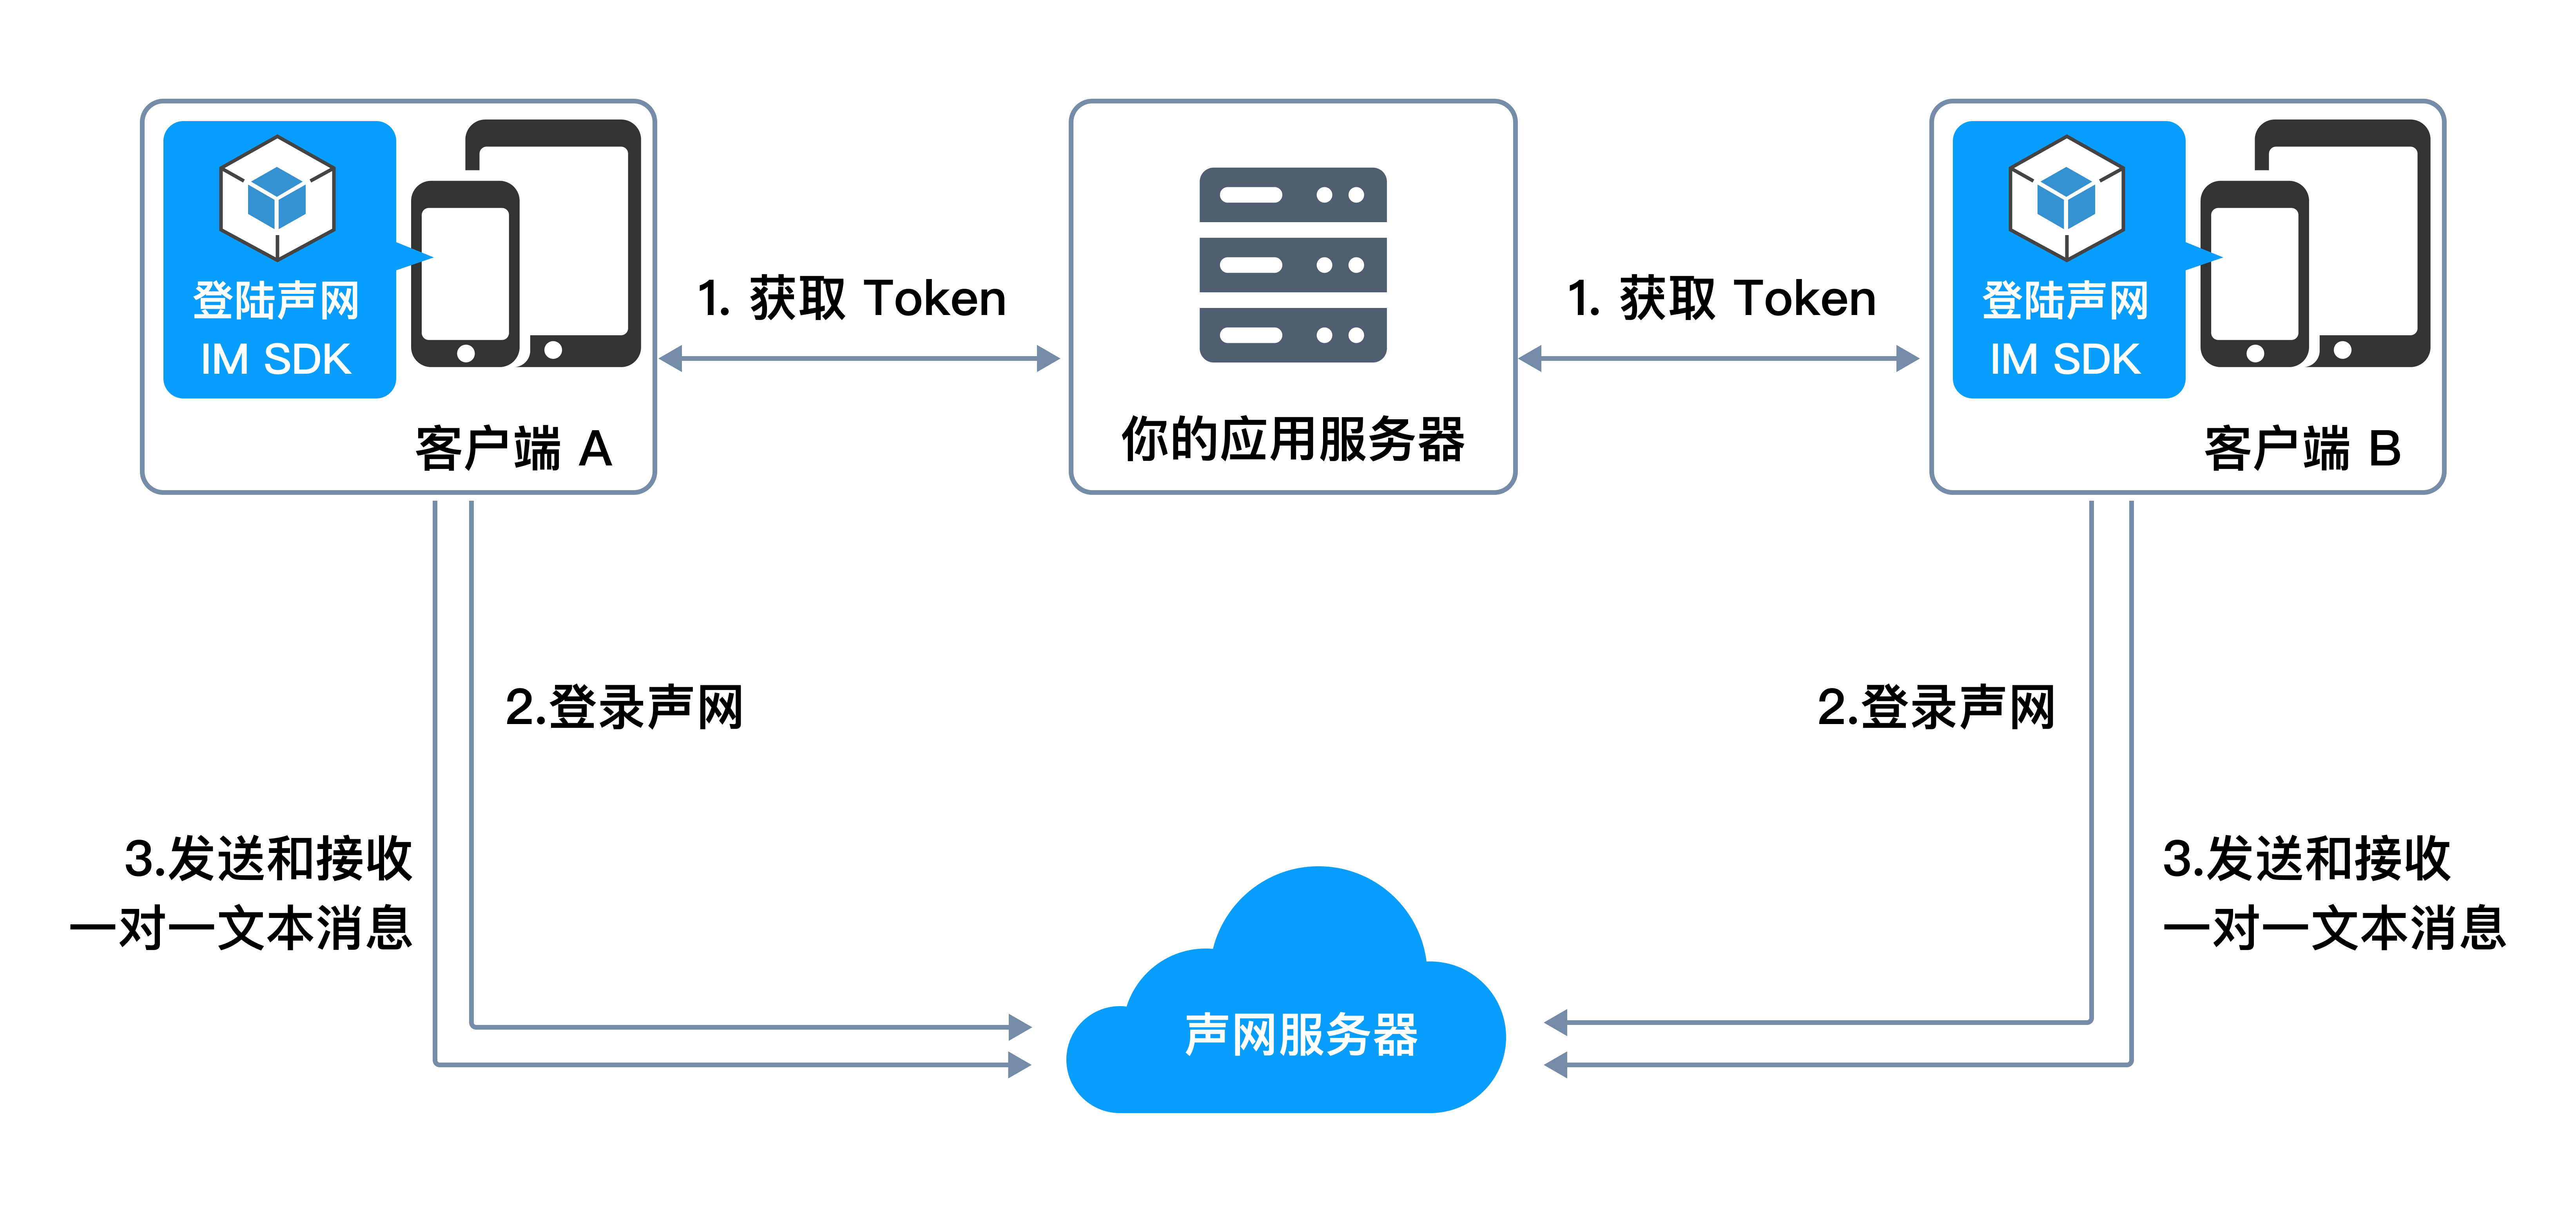
实现原理
下图展示在客户端发送和接收一对一文本消息的工作流程。
前提条件
- 有效的即时通讯 IM 开发者账号;
- 创建即时通讯 IM 项目并获取 App ID;
- npm;
- SDK 支持 IE 11+、Firefox 10+、Chrome 54+ 和 Safari 6+。
操作步骤
1. 准备开发环境
本节介绍如何创建项目,将即时通讯 IM Web SDK 集成到你的项目中。
新建 Web 项目
新建 quickstart 目录。在该目录下运行 npm init 命令创建 package.json 文件,然后创建以下文件:
index.html:设置 Web 应用的用户界面;index.js:包含消息发送和接收逻辑的实现代码。此时你的目录中包含以下文件:
quickstart
├─ index.html
├─ index.js
└─ package.json
2. 集成 SDK
- 在
package.json中的dependencies字段中加入shengwang-chat及对应版本:
{
  "name": "web",
  "version": "1.0.0",
  "description": "",
  "main": "index.js",
  "scripts": {
    "test": "echo \"Error: no test specified\" && exit 1"
  },
  "dependencies": {
    "shengwang-chat": "latest"
  },
  "author": "",
  "license": "ISC"
}
3. 注册即时通讯 IM 用户
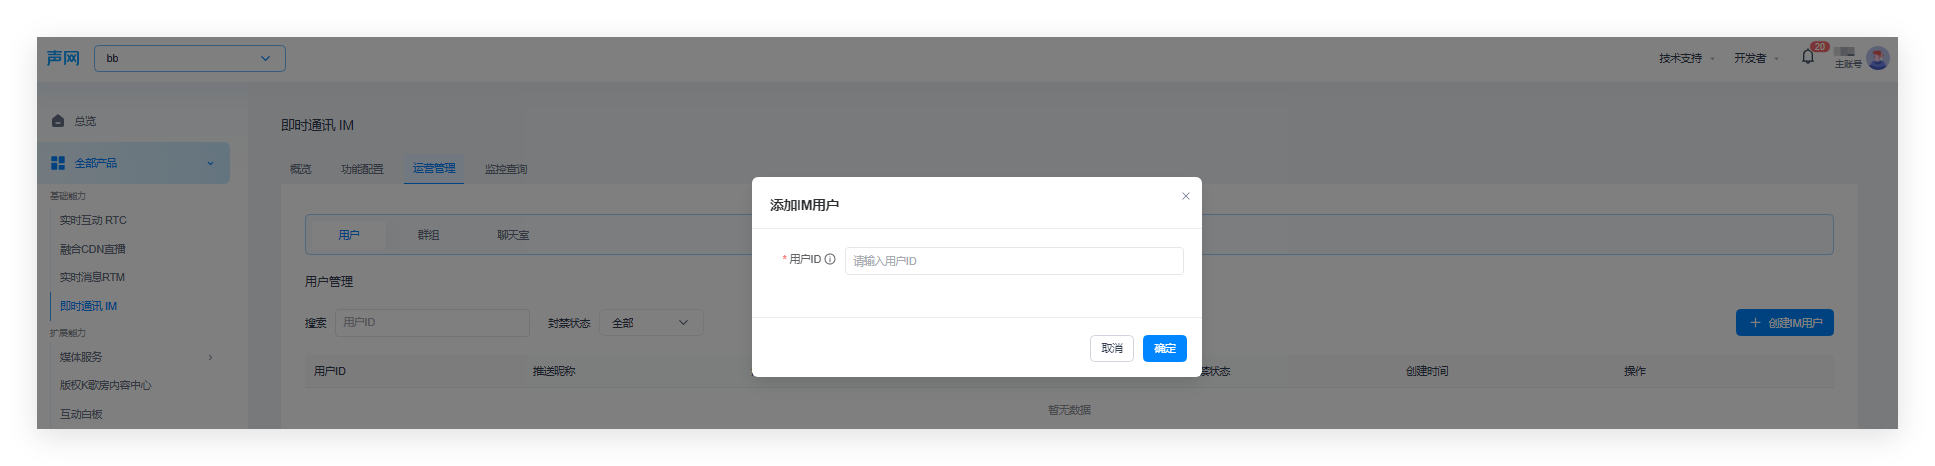
创建用户
在声网控制台按照如下步骤创建用户:
展开控制台左上角下拉框,选择需要开通即时通讯 IM 服务的项目。
点击左侧导航栏的全部产品。
在下拉列表中找到即时通讯 IM 并点击。
在即时通讯 IM 页面,进入运营管理标签页。
在用户 页签下,点击创建 IM 用户。
在弹出的对话框中,配置用户相关参数,点击确定。
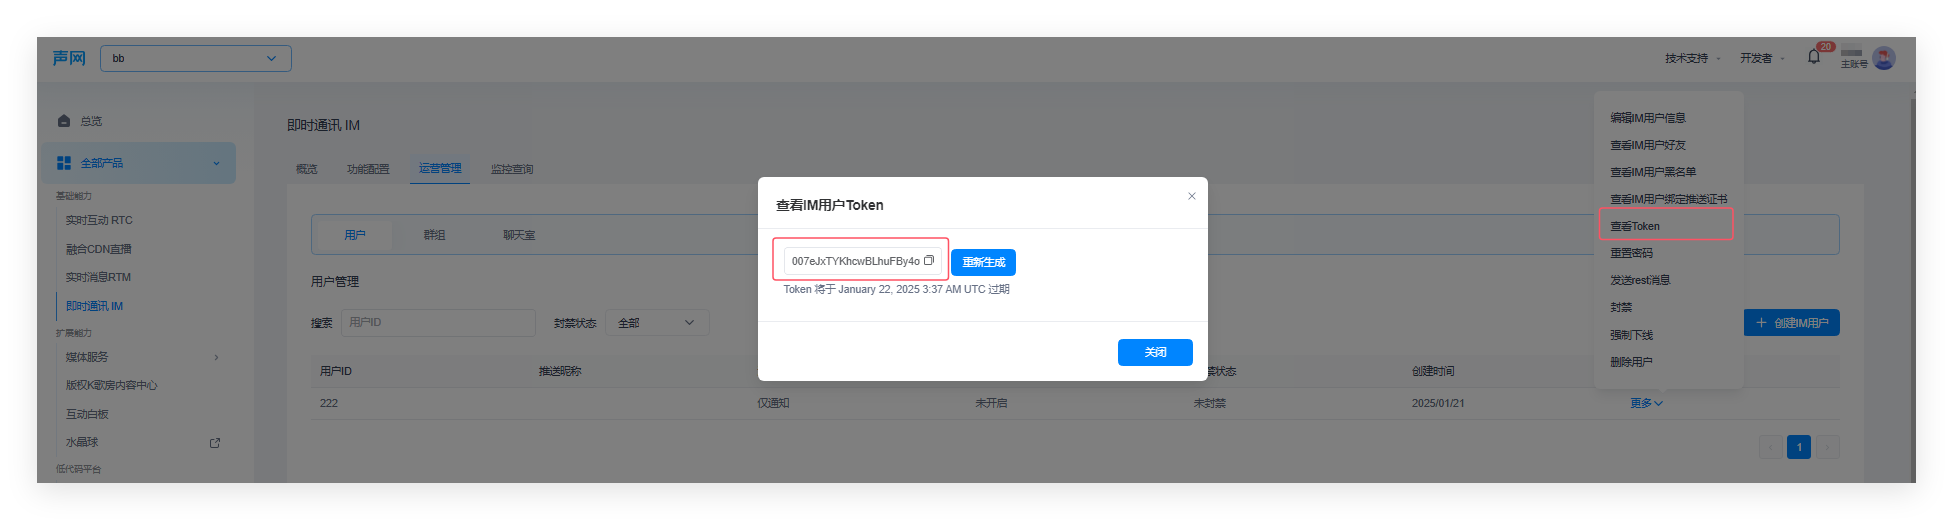
获取用户 token
创建用户后,在用户列表点击对应的用户的操作一栏中的更多,选择查看 Token。
在弹出的对话框中,可以查看用户 Token,也可以点击重新生成,生成用户 token。
在生产环境中,为了安全考虑,你需要部署 App Server 生成 Token,详见 Token 鉴权文档。
4. 实现用户界面
index.html 的内容如下。
<script src="./dist/bundle.js"></script> 用于引用 webpack 打包之后的 bundle.js 文件。webpack 的配置在后续步骤中介绍。
<!DOCTYPE html>
<html lang="en">
  <head>
    <meta charset="UTF-8" />
    <title>Shengwang Chat Examples</title>
  </head>

  <body>
    <h2 class="left-align">Shengwang Chat Examples</h2>
    <form id="loginForm">
      <div class="col" style="min-width: 433px; max-width: 443px">
        <div class="card" style="margin-top: 0px; margin-bottom: 0px;">
          <div
            class="row card-content"
            style="margin-bottom: 0px; margin-top: 10px;"
          >
            <div class="input-field">
              <label>UserID</label>
              <input type="text" placeholder="UserID" id="userID" />
            </div>
            <div class="input-field">
              <label>Token</label>
              <input type="text" placeholder="Token" id="token" />
            </div>
            <div class="row">
              <div>
                <button type="button" id="login">login</button>
                <button type="button" id="logout">logout</button>
              </div>
            </div>
            <div class="input-field">
              <label>Peer UserID</label>
              <input type="text" placeholder="Peer UserID" id="peerId" />
            </div>
            <div class="input-field">
              <label>Peer Message</label>
              <input type="text" placeholder="Peer message" id="peerMessage" />
              <button type="button" id="send_peer_message">send</button>
            </div>
          </div>
        </div>
      </div>
    </form>
    <hr />
    <div id="log"></div>
  </body>
  <script src="./dist/bundle.js"></script>
</html>
5. 实现消息发送与接收
index.js 的内容如下。本文使用 import 方法导入 SDK,并使用 webpack 对 JavaScript 文件进行打包,以避免浏览器兼容性问题。你需要分别将代码中的 <Your appId> 替换为你之前获取的 App ID。
import ChatSDK from "shengwang-chat";
const appId = "<Your appId>";

let userId, token;

// 初始化客户端。相关的参数配置,详见 API 参考中的 `Connection` 类。
const chatClient = new ChatSDK.connection({
  appId,
});

// 添加回调函数。
chatClient.addEventHandler("connection&message", {
  onConnected: () => {
    document
      .getElementById("log")
      .appendChild(document.createElement("div"))
      .append("Connect success !");
  },
  onDisconnected: () => {
    document
      .getElementById("log")
      .appendChild(document.createElement("div"))
      .append("Logout success !");
  },
  onTextMessage: (message) => {
    console.log(message);
    document
      .getElementById("log")
      .appendChild(document.createElement("div"))
      .append("Message from: " + message.from + " Message: " + message.msg);
  },
  onError: (error) => {
    console.log("on error", error);
  },
});

// 按钮行为定义。
window.onload = function () {
  // 登录。
  document.getElementById("login").onclick = function () {
    userId = document.getElementById("userID").value.toString();
    token = document.getElementById("token").value.toString();
    chatClient
      .open({ user: userId, accessToken: token })
      .then((res) => {
        document
          .getElementById("log")
          .appendChild(document.createElement("div"))
          .append(`Login Success`);
      })
      .catch((e) => {
        document
          .getElementById("log")
          .appendChild(document.createElement("div"))
          .append(`Login failed`);
      });
  };

  // 登出。
  document.getElementById("logout").onclick = function () {
    chatClient.close();
  };

  // 发送一条单聊消息。
  document.getElementById("send_peer_message").onclick = function () {
    let peerId = document.getElementById("peerId").value.toString();
    let peerMessage = document.getElementById("peerMessage").value.toString();
    let option = {
      chatType: "singleChat", // 会话类型,设置为单聊。
      type: "txt", // 消息类型。
      to: peerId, // 消息接收方(用户 ID)。
      msg: peerMessage, // 消息内容。
    };
    let msg = ChatSDK.message.create(option);
    chatClient
      .send(msg)
      .then((res) => {
        console.log("send private text success");
        document
          .getElementById("log")
          .appendChild(document.createElement("div"))
          .append("Message send to: " + peerId + " Message: " + peerMessage);
      })
      .catch(() => {
        console.log("send private text fail");
      });
  };
};
提示
对于 Typescript,通过以下代码引入类型声明:
import ChatSDK, { ShengwangChat } from "shengwang-chat";
6. 运行项目
本文使用 webpack 对项目进行打包,并使用 webpack-dev-server 运行项目。
- 在
package.json的dependencies字段中添加webpack、webpack-cli和webpack-dev-server,并且在scripts字段中添加build和start:dev命令。
{
  "name": "web",
  "version": "1.0.0",
  "description": "",
  "main": "index.js",
  "scripts": {
    "build": "webpack --config webpack.config.js",
    "start:dev": "webpack serve --open --config webpack.config.js"
  },
  "dependencies": {
    "shengwang-chat": "latest",
    "webpack": "^5.50.0",
    "webpack-dev-server": "^3.11.2",
    "webpack-cli": "^4.8.0"
  },
  "author": "",
  "license": "ISC"
}
- 在项目根目录中添加
webpack.config.js文件,用于配置 webpack。文件内容如下:
const path = require("path");

module.exports = {
  entry: "./index.js",
  mode: "production",
  output: {
    filename: "bundle.js",
    path: path.resolve(__dirname, "./dist"),
  },
  devServer: {
    compress: true,
    port: 9000,
    https: true,
  },
};
此时你的目录中包含以下文件:
quickstart
├─ index.html
├─ index.js
├─ package.json
└─webpack.config.js
- 在项目根目录运行以下命令,安装依赖项。
$ npm install
- 运行以下命令使用
webpack构建并运行项目。
# 使用 webpack 打包。
$ npm run build

# 使用 webpack-dev-server 运行项目。
$ npm run start:dev
项目启动后,利用该用户 ID 和 Token 登录。登录成功后,输入对方的用户 ID 和要发送的消息,点击发送按钮发送消息,可同时打开另一页面相互收发消息。