快速开始
快速开始
利用单群聊 UIKit,你可以轻松实现单群和群聊。本文介绍如何快速实现在单聊和群聊会话中发送消息。
前提条件
开始前,请确保你的开发环境满足以下条件:
- Android Studio 4.0 及以上
- Gradle 4.10.x 及以上
- targetVersion 26 及以上
- Android SDK API 21 及以上
- JDK 11 及以上
项目准备
本节介绍将单群聊 UIKit 引入项目中的必要环境配置。
- 使用 Android Studio 创建一个新项目。
- 在 Phone and Tablet 标签选择 Empty Views Activity。
- Minimum SDK 选择 API 21: Android 5.0 (Lollipop)。
- Language 选择 Kotlin。
创建项目成功后,请确保项目同步完成。
- 在项目中引入单群聊 UIKit。
本地依赖 从 GitHub 获取单群聊 UIKit 源码,按照下面的方式集成:
- 在 Project 的
settings.gradle.kts文件中添加如下代码:
include(":chat-uikit")
project(":chat-uikit").projectDir = File("../ShengwangChat-UIKit-android/ease-im-kit")
- 在 app 的
build.gradle.kts文件中添加如下代码:
//chatuikit-android
implementation(project(mapOf("path" to ":chat-uikit")))
- 防止代码混淆
在 /Gradle Scripts/proguard-rules.pro 文件中添加如下代码:
-keep class io.agora.** {*;}
-dontwarn  io.agora.**
实现发送第一条单聊消息
本节介绍如何通过单群聊 UIKit 实现发送第一条单聊消息。
第一步 创建快速开始页面
- 打开
app/res/values/strings.xml文件,并替换为如下内容:
<resources>
    <string name="app_name">quickstart</string>

    <string name="app_id">[你申请的 App ID]</string>
</resources>
提示
你需要将 app_id 替换为你申请的 App ID。
- 打开
app/res/layout/activity_main.xml文件,并替换为如下内容:
<?xml version="1.0" encoding="utf-8"?>
<LinearLayout xmlns:android="http://schemas.android.com/apk/res/android"
    xmlns:tools="http://schemas.android.com/tools"
    android:layout_width="match_parent"
    android:layout_height="match_parent"
    android:orientation="vertical"
    tools:context=".MainActivity">

    <EditText
        android:id="@+id/et_userId"
        android:layout_width="match_parent"
        android:layout_height="50dp"
        android:layout_margin="20dp"
        android:hint="UserId"/>

    <EditText
        android:id="@+id/et_token"
        android:layout_width="match_parent"
        android:layout_height="50dp"
        android:layout_margin="20dp"
        android:hint="Chat Token"/>

    <Button
        android:id="@+id/btn_login"
        android:layout_width="match_parent"
        android:layout_height="50dp"
        android:layout_margin="20dp"
        android:onClick="login"
        android:text="Login"/>

    <Button
        android:id="@+id/btn_logout"
        android:layout_width="match_parent"
        android:layout_height="50dp"
        android:layout_margin="20dp"
        android:onClick="logout"
        android:text="Logout"/>

    <EditText
        android:id="@+id/et_peerId"
        android:layout_width="match_parent"
        android:layout_height="50dp"
        android:layout_margin="20dp"
        android:hint="PeerId"/>

    <Button
        android:id="@+id/btn_chat"
        android:layout_width="match_parent"
        android:layout_height="50dp"
        android:layout_margin="20dp"
        android:onClick="startChat"
        android:text="Start Chat"/>

</LinearLayout>
第二步 实现代码逻辑
初始化 UIKit。
实现登录和退出页面。
提示
若你已集成了即时通讯 IM SDK,SDK 的所有用户 ID 均可用于登录单群聊 UIKit。
在声网控制台按照如下步骤创建用户:
展开控制台左上角下拉框,选择需要开通即时通讯 IM 服务的项目。
点击左侧导航栏的全部产品。
在下拉列表中找到即时通讯 IM 并点击。
在即时通讯 IM 页面,进入运营管理标签页。
在用户 页签下,点击创建IM用户。
在弹出的对话框中,配置用户相关参数,点击确定。
在用户列表中,在新创建的用户的操作一栏中,点击更多,选择查看Token,查看该用户的 token。在开发环境中,你需要从你的 App Server 获取用户 token,详见使用 Token 鉴权。
完整实现示例代码:
打开 MainActivity 文件,并替换为如下代码。
package io.agora.quickstart

import androidx.appcompat.app.AppCompatActivity
import android.os.Bundle
import android.view.View
import io.agora.quickstart.databinding.ActivityMainBinding
import io.agora.chat.uikit.ChatUIKitClient
import io.agora.chat.uikit.common.ChatLog
import io.agora.chat.uikit.common.ChatOptions
import io.agora.chat.uikit.common.extensions.showToast
import io.agora.chat.uikit.feature.chat.enums.ChatUIKitType
import io.agora.chat.uikit.feature.chat.activities.UIKitChatActivity
import io.agora.chat.uikit.interfaces.ChatUIKitConnectionListener
import io.agora.chat.uikit.model.ChatUIKitProfile

class MainActivity : AppCompatActivity() {
    private val binding: ActivityMainBinding by lazy { ActivityMainBinding.inflate(layoutInflater) }

    private val connectListener by lazy {
        object : ChatUIKitConnectionListener() {
            override fun onConnected() {}

            override fun onDisconnected(errorCode: Int) {}

            override fun onLogout(errorCode: Int, info: String?) {
                super.onLogout(errorCode, info)
                runOnUiThread { showToast("You have been logged out, please log in again!") }
                ChatLog.e(TAG, "")
            }
        }
    }
    override fun onCreate(savedInstanceState: Bundle?) {
        super.onCreate(savedInstanceState)
        setContentView(binding.root)
        initSDK()
        initListener()
    }

    private fun initSDK() {
        val appId = getString(R.string.app_id)
        if (appId.isEmpty()) {
            applicationContext.showToast("You should set your AppId first!")
            ChatLog.e(TAG, "You should set your AppId first!")
            return
        }
        ChatOptions().apply {
            // Set your own appId here
            this.appId = appId
            // Set not to log in automatically
            this.autoLogin = false
            // Set whether confirmation of delivery is required by the recipient. Default: false
            this.requireDeliveryAck = true
        }.let {
            ChatUIKitClient.init(applicationContext, it)
        }
    }

    private fun initListener() {
        ChatUIKitClient.addConnectionListener(connectListener)
    }

    fun login(view: View) {
        val username = binding.etUserId.text.toString().trim()
        val chatToken = binding.etToken.text.toString().trim()
        if (username.isEmpty() || chatToken.isEmpty()) {
            showToast("Username or ChatToken cannot be empty!")
            ChatLog.e(TAG, "Username or ChatToken cannot be empty!")
            return
        }
        if (!ChatUIKitClient.isInited()) {
            showToast("Please init first!")
            ChatLog.e(TAG, "Please init first!")
            return
        }
        ChatUIKitClient.login(
            ChatUIKitProfile(username), chatToken
            , onSuccess = {
                runOnUiThread { showToast("Login successfully!") }
                ChatLog.e(TAG, "Login successfully!")
            }, onError = { code, message ->
                runOnUiThread { showToast("Login failed: $message") }
                ChatLog.e(TAG, "Login failed: $message")
            }
        )
    }

    fun logout(view: View) {
        if (!ChatUIKitClient.isInited()) {
            showToast("Please init first!")
            ChatLog.e(TAG, "Please init first!")
            return
        }
        ChatUIKitClient.logout(false
            , onSuccess = {
                runOnUiThread { showToast("Logout successfully!") }
                ChatLog.e(TAG, "Logout successfully!")
            }
        )
    }

    fun startChat(view: View) {
        val username = binding.etPeerId.text.toString().trim()
        if (username.isEmpty()) {
            showToast("Peer id cannot be empty!")
            ChatLog.e(TAG, "Peer id cannot be empty!")
            return
        }
        if (!ChatUIKitClient.isLoggedIn()) {
            showToast("Please login first!")
            ChatLog.e(TAG, "Please login first!")
            return
        }
        UIKitChatActivity.actionStart(this, username, ChatUIKitType.SINGLE_CHAT)
    }

    override fun onDestroy() {
        ChatUIKitClient.removeConnectionListener(connectListener)
        ChatUIKitClient.releaseGlobalListener()
        super.onDestroy()
    }

    companion object {
        private const val TAG = "MainActivity"
    }
}
- 点击
Sync Project with Gradle Files同步工程。现在可以测试你的应用了。
第三步 发送第一条消息
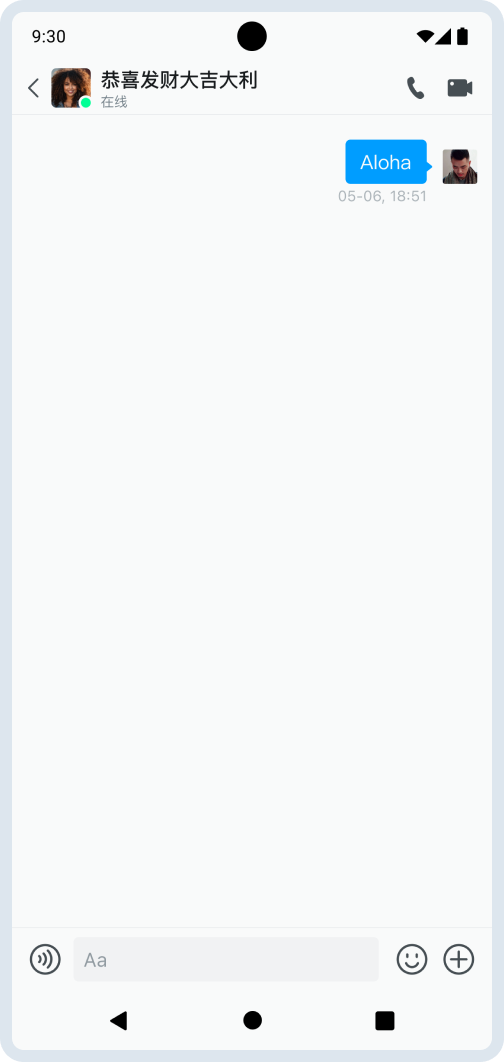
在聊天页面下方输入消息,然后点击发送按钮发送消息。

测试应用
在 Android Studio 中,点击
Run ‘app’按钮,将应用运行到你的设备或者模拟器上。输入用户 ID 和密码,点击
Login按钮进行登录,登录成功或者失败有Toast提示,或者通过 Logcat 查看。在另一台设备或者模拟器上登录另一个账号。
两台设别或者模拟器分别输入对方的账号,并点击
Start Chat按钮,进入聊天页面。现在你可以在两个账号间进行聊天了。